As we know one of the exciting
features in InfoPath 2010 is the ability to extend or enhance the forms used by
SharePoint lists for creating, editing, or showing list items. Today, you can
modify list forms layouts, set validation rules, or create additional views
using little or no code. When you are finished modifying the list forms,
reflecting your changes back to SharePoint is just a matter of using the
one-click publishing capability that comes out of the box with the list form.
In this post, I will show how to use
Infopath data connection to build rules for hiding/disabling fields based on
the SharePoint group membership of current user. In my case, I would like to
fill First Name, Last Name, E-Mail Address and Employee Status based on PID
(Employee ID) from user profile and Hide the Save and Cancel buttons as shown below for any users who are not members of SharePoint
group “Site
Owners”.
Here are my steps to achieve the goal:
1.
The first very step obviously is
clicking the Customize
Form on the ribbon to edit the form in InfoPath
Designer.
2.
Adding two SOAP Web Services data
connections to the forms, there are a lot of articles about this topic, so I
wouldn’t go into any detail such as this one.
§
GetUserProfileByName in http://<server-name>/_vti_bin/UserProfileService.asmx. Check
‘Automatically retrieve data checkbox when
the form opened’. So, the first action that you will create is a query for that
connection. If you do not pass a parameter to the User Profile Service, the
profile information that is returned is for the current user, which is the
outcome that you want for a new request.
§
GetGroupCollectionFromUser in http://server-name/_vti_bin/UserGroup.asmx (put a sample value, of an existing account such as domain\account_name). Clear ‘automatically retrieve data when the form opened’ checkbox.
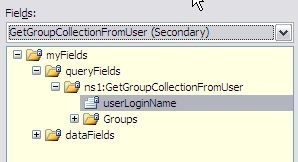
3.
Now the problem is that the generated
data connection doesn’t display the returned fields. As shown in the picture,
the dataFields children elements only contain userLoginName which is not
correct.
4.
I
found an approach from Sumit’s
SharePoint blog, he explains how to correct the xsd in ‘Correcting
the xsd for the Return Fields’ section in his post.
5.
Save the form as source files as we are
going to modify the xml schema of the GetGroupCollectionFromUser data
connection. To save the form as sources, go to Files -> Publish as shown
below and then click Export
Source Files on the next window. The exported files
would look like the below screenshot.
6.
It consists of infopath definition file
(manifest.xsf), xml schemas of all data connections (.xsd files), some xml
files that contain sample data of the data connections and an xsl file
(view.xsl) used for form rendering. In our case, we only focus on
GetGroupCollectionFormUser.xsd (the xml schema for GetGroupCollectionFromUser
data connection).
7.
Modify the
GetGroupCollectionFromUser1.xsd, and make sure to close the InfoPath Designer
before editing. To summarize his approach basically, we need to add this below
type definition
<s:complexType
name="GetGroupCollectionFromUserType">
<s:sequence>
<s:element minOccurs="0" maxOccurs="1"
name="userLoginName" type="s:string"/>
<s:element minOccurs="0" maxOccurs="1"
name="Groups">
<s:complexType>
<s:sequence>
<s:element maxOccurs="unbounded" name="Group"
>
<s:complexType>
<s:attribute
name="ID" type="s:unsignedShort"></s:attribute>
<s:attribute
name="Name" type="s:string"></s:attribute>
<s:attribute
name="Description" type="s:string"></s:attribute>
<s:attribute
name="OwnerID"
type="s:unsignedByte"></s:attribute>
<s:attribute
name="OwnerIsUser" type="s:string"></s:attribute>
</s:complexType>
</s:element>
</s:sequence>
</s:complexType>
</s:element>
</s:sequence>
</s:complexType>
8.
below this line (at the 2nd line of the
file)
<s:import namespace="http://www.w3.org/2001/XMLSchema"></s:import>
|
|
9.
Then find this below:
<s:element name="GetGroupCollectionFromUser">
<s:complexType>
<s:sequence>
<s:element minOccurs="0" maxOccurs="1" name="userLoginName" type="s:string">
</s:element>
</s:sequence>
</s:complexType>
</s:element>
10.
Replace it with this:
<s:element name="GetGroupCollectionFromUser" type="tns:GetGroupCollectionFromUserType">
</s:element>
11.
Save GetGroupCollectionFromUser1.xsd and
open manifest.xsf in design mode. You can see ID, Name, Description, OwnerID
and OwnerIsUser fields under Group as displayed in the picture.
12.
Now my connections are configured. Next
step is to create a rule to invoke GetUserProfileByName web service to fill
details from user profile and invoke GetGroupCollectionFromUser web services
method to hide buttons.
13.
As the method is not invoked when the
form is opened, we need to invoke the method after the GetUserProfileByName
invocation is finished. To do this, Choose GetUserProfileByName data connection
and apply rules on the Get
User Details button.
14.
Set rule type is Action. The rule actions are:
I.
Set field’s value : AccountName from the
GetUserProfileByName to PID
II. Query GetUserProfileByName data
connection to get user details for given PID
III.
Set FirstName field form user profile. This blog shows how
to set the property value.
IV.
Using step III. you can fill Last Name,
Email and Employee Status fields.
V.
Now the next step is to query
GetGroupCollectionFromUser to get SharePoint user group for this user.
VI.
Set field’s value: the userLoginName of
the GetGroupCollectionFromUser’s queryFields to the Property value AccountName
from the GetUserProfileByName.
 .
.
VII. Query for data:
GetGroupCollectionFromUser.
VIII. Create a formatting rule for the field
(in my case approval field) that we want to disable/hide if current user is not
member of a SharePoint Group. Put a condition as below, where The “Site Owners”
is the SharePoint Group Name.
And finally when you publish the form,
it would look like the below screen-shot:
Once you click, “Get User Details”, you
will get the below screen which contains “Submit” button for users who are
members of “Site Owners”.
NOTE:
“Submit” button will not be seen below “Child Details” section for users who
are not members of “Site Owners”.


